Working with Photos
Upload, caption, annotate, and organize photos and videos while writing a report.
Overview
Every item in the report has its own Photos tab where you can upload images, mark them up, and reuse them across the report. This guide covers the photo tools inside the inspection editor.
For report-enabled accounts
Photos are part of the inspection reporting tools — see Writing a Report for the rest of the report-building workflow.
Uploading Photos
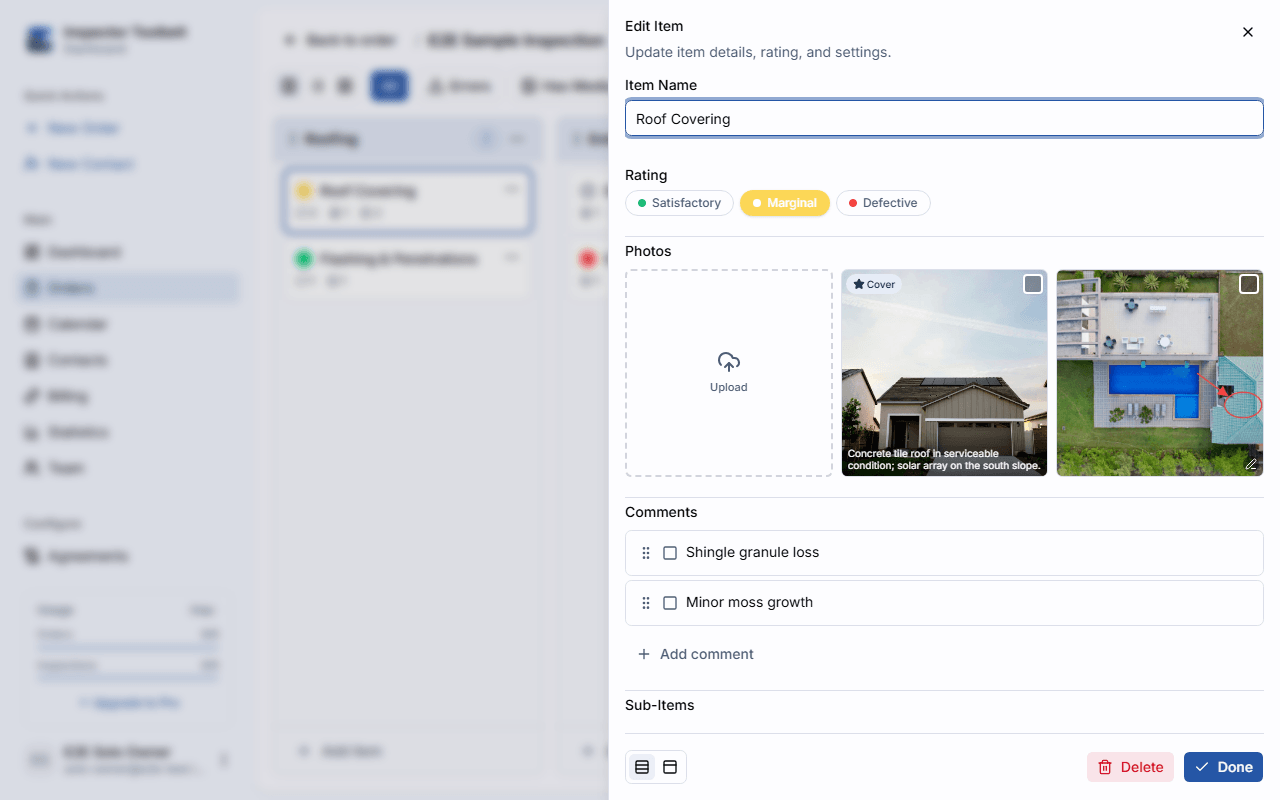
Open an item and go to its Photos tab, then click Upload or drag image files directly onto the tab.
HEIC photos aren't supported
Accepted photo formats are JPEG, PNG, and WebP (MP4 or QuickTime for video). If an upload is rejected with a message like "1 file has an invalid format," it's usually a HEIC photo — the default format on newer iPhones. Switch your iPhone's camera to Most Compatible (Settings → Camera → Formats) so new photos save as JPEG, or export the photo as JPEG before uploading it here.
Captions
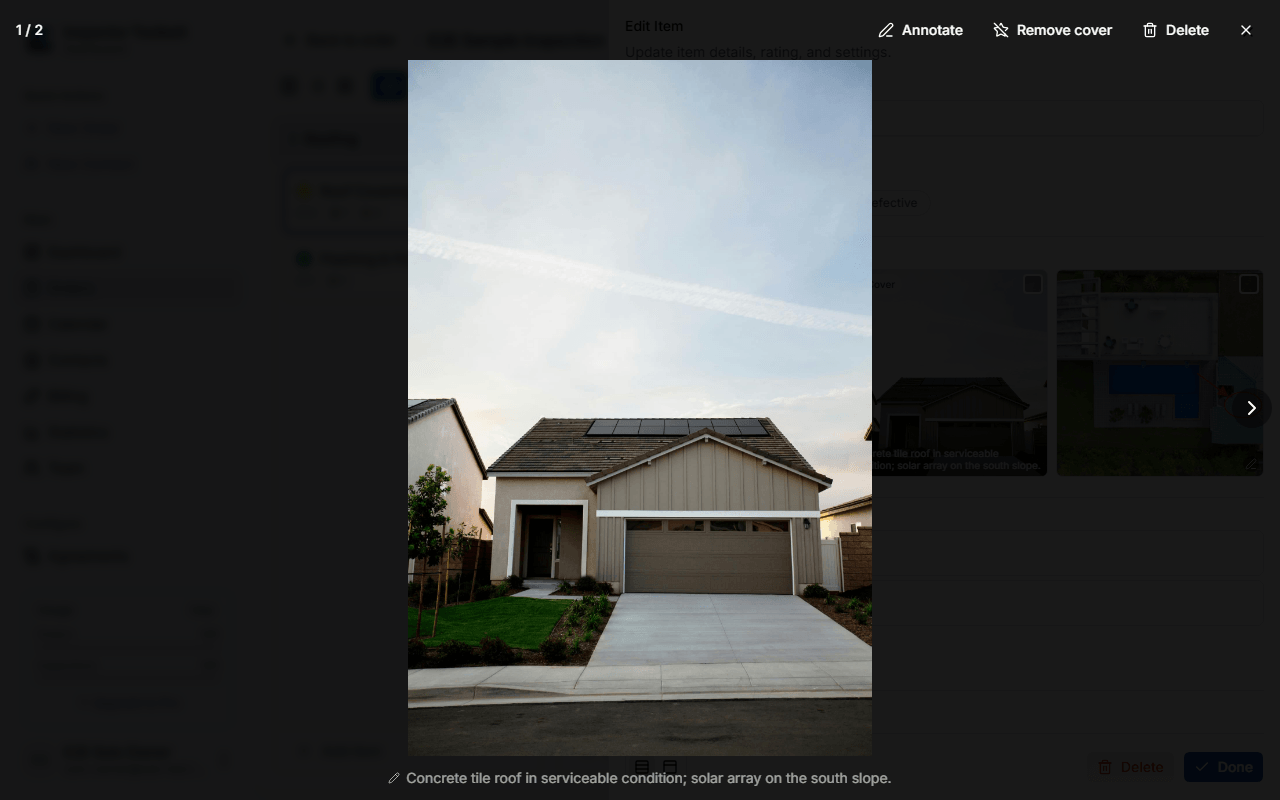
Every photo tile has an inline Add caption… field — click it to type a short caption without leaving the grid. You can also add or edit a caption from the lightbox (click a photo to open it full-size).
Annotating a Photo
Open a photo in the lightbox and click Annotate to mark it up with a Select, Draw, Arrow, Rectangle, Ellipse, or Text tool, plus Undo/Redo. To remove a single shape, switch to the Select tool, click the shape, then click the Delete button next to Undo/Redo (or press Delete/Backspace on your keyboard).
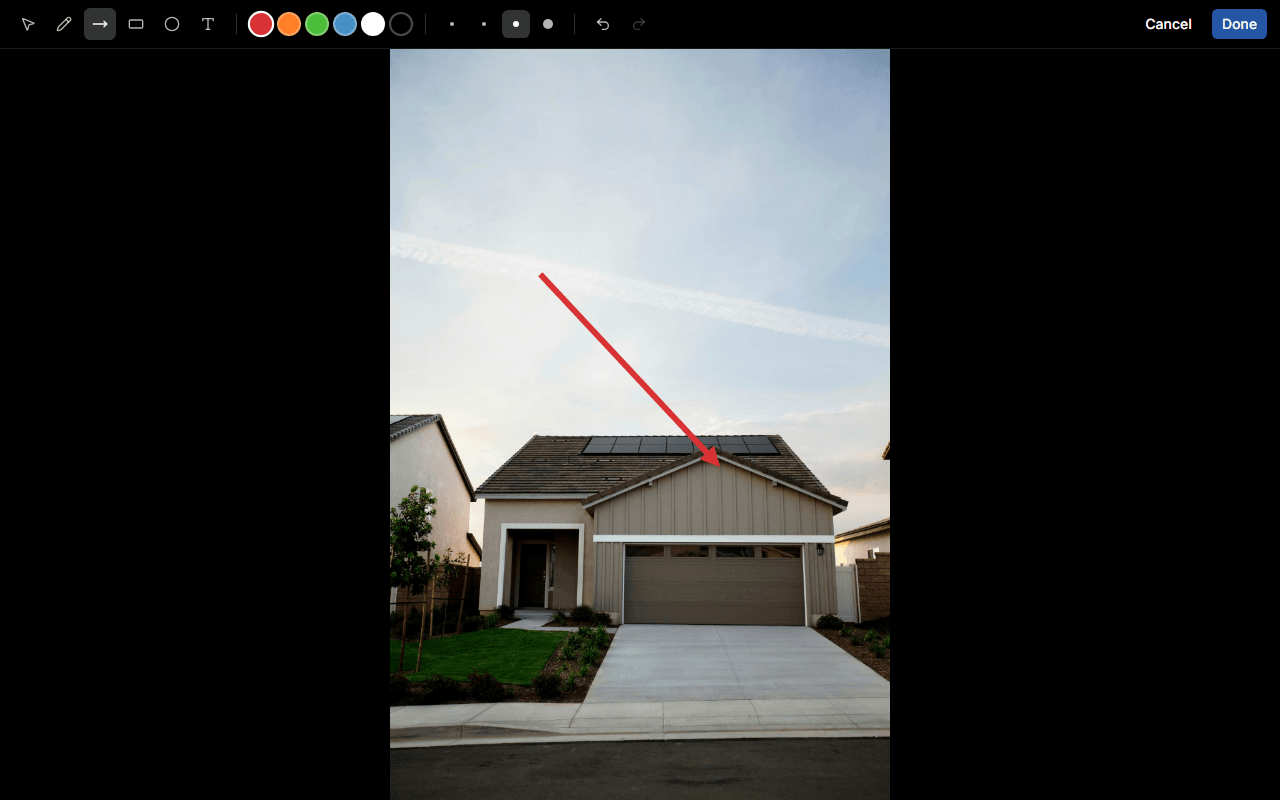
Zoom in with the editor's −/+ buttons, or hold Ctrl (⌘ on a Mac) and scroll or pinch on a trackpad — click the percentage button between the zoom buttons to reset back to fit. Once you're zoomed in, pan around the photo with the Hand tool, by holding Space and dragging with any tool selected, by dragging with your mouse's middle button, with the arrow pad that appears in the bottom-right corner of the photo, or with your keyboard's arrow keys. Rotate left and Rotate right turn the photo a quarter-turn at a time.
Zooming and panning never change the saved photo — you can zoom in just to draw something precisely and zoom back out without cropping anything. Click Crop to enter crop mode, then drag on the photo to draw a rectangle around the area you want to keep. Drag its edges or corners to adjust it, or drag inside it to move it, then click Apply crop — or press Escape to leave crop mode without changing anything. Once you've cropped, a Reset crop button appears next to the Crop button — click it to bring back the full photo. You can crop again inside an existing crop (clicking Crop shows the whole photo again with your existing rectangle already drawn, so you can widen it), and cropping and rotating can be combined in either order.
Annotations never overwrite the original
The app keeps your original, unmarked photo behind the scenes. Opening Annotate again always starts from that clean image — you're never drawing on top of your last set of markup, so you can freely redo an annotation without degrading the photo. Rotating and cropping work the same way: they're non-destructive, so the original stays untouched, and opening Annotate again shows your rotation and crop exactly as you left them. Shapes you drew outside a cropped area aren't deleted — they're hidden until you click Reset crop, at which point they reappear. The report shows the photo rotated and cropped.
Can't re-annotate while syncing (mobile)
On the mobile app, if a photo's annotation hasn't finished uploading yet, opening Annotate on it again shows a brief message at the bottom of the screen saying the edit is still syncing, instead of opening the editor. Wait for the sync to finish, then try again.
On the mobile app, pinch with two fingers on the photo to zoom in and out, and drag with two fingers to pan around while you're zoomed in — drawing with one finger still works the same as before. Tap the zoom badge to reset back to fit. The row of controls above the photo starts with the ⓘ Details button, then Rotate left and Rotate right, for the same quarter-turn rotation as on the dashboard, then Crop to view and Reset crop: Crop to view crops the photo down to whatever's currently visible, and Reset crop brings back the full photo. Delete, Undo and Clear sit together at the right-hand end of that row. The drawing tools, colors and line widths are below the photo. To select a shape, tap its line — for a box or circle, tap the outline, not the inside — and a dashed box appears around it. To move it, drag it with one finger: a selected box, circle or text can be dragged from anywhere inside it, and an arrow or freehand line by its line. A selected arrow also shows a dot at each end; drag a dot to move just that end of the arrow. Starting a drag anywhere else still draws with the current tool. To remove the selected shape, tap Delete next to Undo. Undo reverses a move or a delete in one step. Tap Save at the top of the screen to keep your markup. If you close the editor with unsaved changes — with the close button, by swiping it down, or with Android's back gesture — you're asked whether to discard them first.
Reordering Photos
Drag a photo tile to a new position within the same item's gallery to reorder it. Reordering isn't available while any photos are selected.
In the mobile app, press and hold a photo to select it. With just that one photo selected, tap Move earlier or Move later below the selection toolbar to move it one place at a time. Photos that are still waiting to upload can't be moved until they finish.
Moving and Copying Photos
Available while writing a report
Move and Copy work in the inspection editor. They aren't available in the template editor.
Select one or more photos (long-press or click the checkbox that appears on hover) to reveal a toolbar with Move, Copy, and Delete.
Choose Move or Copy
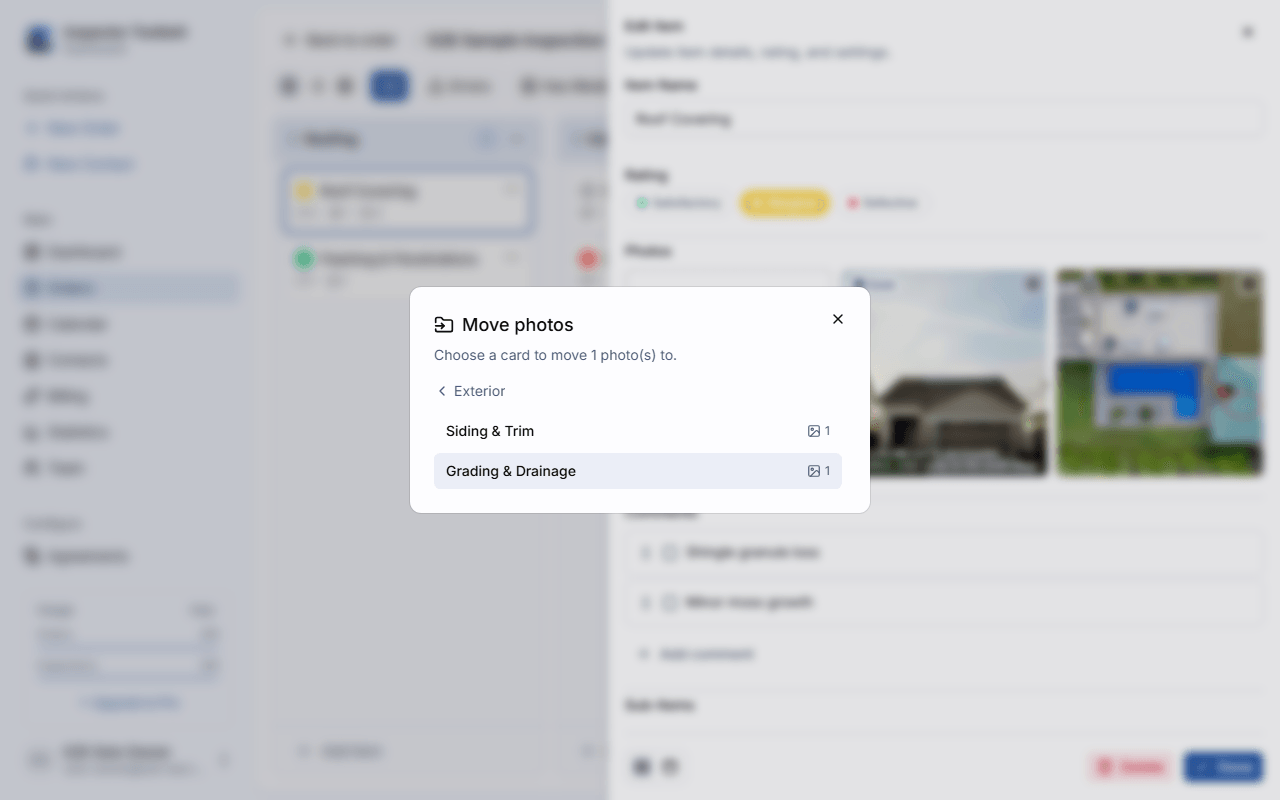
Move re-parents the selected photos onto a different item. Copy creates linked copies on a different item and leaves the originals where they are.
Pick a Destination
Pick a Section first, then the Item within it. Items with sub-items show an expandable count — open it to pick a sub-item as the destination too. The item the photos currently belong to is disabled as a target.
A copy shares its image with the original
Copying a photo doesn't re-upload it — the copy points at the same stored image as the original, so copying many photos doesn't use extra storage. Once created, a copy is its own gallery entry: editing its caption, annotations, or category doesn't affect the original (or any other copy), and deleting a copy only removes that copy.
Cover Photo and Standards Images
Click Set as cover on any photo (in the grid or the lightbox) to use it as the report's cover image. Only one photo can be the cover at a time — setting a new one replaces the old one.
Cover photos on mobile
On the mobile app, a cover photo is captured the same way as any item photo — it's queued, retried automatically, and uploaded in the background, even without a connection. While it's syncing, it shows in the app's Pending Sync list as "Cover Photo". You can also set or clear the cover from an existing item photo: tap it to open the mark-up editor, then tap the ⓘ Details button and check or uncheck Cover photo (not shown for video, and not shown for comment photos — a comment photo can never be the cover).
Comment photos also have a standards-image checkbox, letting you mark a photo as a standards illustration rather than a regular comment photo.
Uploading from the Mobile App
Mobile app only
This section covers the upload queue in the mobile app. Photos you add there keep uploading in the background, so you don't have to wait before moving to the next item.
Tap the banner at the top of the screen in the mobile app to open Pending Sync. The banner appears on the app's main screens only — not on sheets or full-screen forms like a new order or the photo editor. You can also open it from the Review link under the Work offline switch. It shows every photo waiting to reach the server, split into an Uploads summary, an Error list for anything that needs a decision from you, and a plain list of everything still waiting.
Tap a photo or video that is waiting or uploading to jump to where it was added. An item's or sub-item's photo opens that item on the board, a comment's photo opens that comment, and a cover photo opens the inspection's Settings. Pending Sync closes first, and Back returns you to the inspection's section list. A photo flagged under Error opens its own screen to resolve it instead.
The app uses the same words everywhere, so the banner and the Pending Sync screen always agree:
| What you see | What it means |
|---|---|
| Connected | Everything has reached the server. Nothing is waiting. |
| Syncing 4 of 12 | Uploads are moving right now. If the app can't tell how big the batch is, it reads Syncing — 4 left instead. |
| Pending 4 — waiting for connection | Four items are queued and waiting. The reason follows the dash: waiting for connection, waiting for Wi-Fi, or uploads paused. |
| Working offline — 4 will upload when you go back online | The Work offline switch is on, not a signal problem — nothing will move until you turn it back off. If nothing is queued it instead reads Working offline — nothing is syncing. |
| Error — 2 uploads need attention | Something needs a decision from you. Open Pending Sync and look under Error. |
Working offline is a switch, not a signal problem
If the banner says Working offline even though you have signal, that's the Work offline switch, turned on from MoreConnection — it stops all syncing on purpose until you turn it off. See Work Offline in the Mobile App for what it does and when to use it.
While uploads are moving there's a thin progress line under the banner, and Pending Sync shows a full progress bar plus how many photos are left and how much data remains, for example "7 photos · 38 MB left."
Only Error asks anything of you. A Pending queue keeps trying on its own in the background and starts uploading again the moment it can.
No more “all synced” pop-up
The app used to flash a message every time uploads finished. It doesn't any more — the banner simply disappears once the queue is empty. If you want to confirm everything made it, open Pending Sync; it shows Connected when there's nothing left waiting.
Taking Photos in the App
Tap Camera on an item and the camera opens inside the app rather than handing you to your phone's camera. Each tap of the shutter takes a photo — there's no "Use Photo" step to confirm afterwards, and the viewfinder stays open between shots, so a run of photos on one item is one tap each. Tap the close button when you're done.
Every shot gives you three signals: a short buzz the moment you tap, the screen blinking like a shutter, and a small round preview of the photo in the bottom-left corner. Just under the buttons at the top, a counter tells you how many photos you've taken this trip.
Tap the round preview, or the close button, when you're finished. Either way you land back on the item with your new photos in view.
Below the shutter is a row with three controls. The round preview of your last photo is on the left. The Video | Photo switch is in the middle — tap the mode you want, or swipe left or right across the picture (swipe right for video, left for photo). The button on the right swaps between the front and rear cameras. The shutter itself also tells you which mode you're in — white for photo, red for video. The switch is hidden while you're recording.
At the top you'll find the close button on the left, and a flash control and a torch (light) toggle together in the middle. The torch lights up in blue while it's on, and stays on between shots, so you only light a dark space once.
If you turn your phone sideways, the buttons rotate to stay upright but the screen itself doesn't flip — and the photo is still saved the right way up.
When you close the camera, the item's photo strip scrolls to the end so the shots you just took are the ones on screen.
Zooming
Zoom starts at 1x every time you open the camera.
Along the bottom of the picture is a row of zoom levels, such as .5, 1, 2, 4, and 8. The level you're on sits in the middle, in a dark circle that shows the exact zoom in blue, like 1.4×. The row slides as you zoom to keep your level in the middle. There are three ways to zoom:
- Tap a level to jump straight to it.
- Drag one finger left or right along the row. Drag left to zoom in and right to zoom out. This works one-handed.
- Pinch on the picture with two fingers.
While you zoom, a scale appears above the row showing exactly where you are, with marks at each zoom level. Lift your finger and the scale disappears again.
Your phone decides the zoom levels
Phones differ. A phone without an ultra-wide lens won't show .5, and how far you can zoom in varies by model — the camera only ever offers what your phone can really do.
Jump straight to mark-up after a single photo
Turn on Auto-annotate on capture under MorePreferences (or the ⋯ menu on an item's photos) and the mark-up editor opens as soon as you close the camera — but only if you took exactly one photo. Take several and it stays out of your way. It works offline too: if the photo can't upload yet, the editor still opens and your mark-up uploads with the photo.
Recording and Uploading Video
Open the camera and switch to Video below the shutter to record a clip for the item — recording is capped at 30 seconds, and clips are recorded at 720p. You can also add an existing video from your device the same way you add photos, by tapping From Library; a video from your library that runs longer than 30 seconds is turned away with a message asking you to trim it first.
While a video is uploading, its thumbnail shows the poster frame (or a movie icon if the poster hasn't finished generating yet) with a play badge and its length. From there it uploads through the same queue as photos — Pending Sync, automatic retries, and the Wi-Fi-only setting below all apply to video the same way they apply to photos. Once uploaded, tap the thumbnail to open the video full-screen with playback controls.
No annotation for video
The mark-up tools described in Annotating a Photo are for still photos only — a video's viewer has no Annotate button.
Videos aren't included in the PDF report yet
A video you add to an item doesn't appear in the generated report — only your photos do.
On the dashboard, once a mobile-recorded video finishes uploading, its tile in the item's photo gallery and in Gallery view shows the video's poster frame with a play icon, the same way it appears on mobile. If no poster frame could be made, the tile shows the play icon on its own.
Adding Photos to a Comment
Mobile app only
The camera icon and Photos card described below are mobile-only. On the dashboard, use each comment row's add-image icon instead — see Add Comments.
On the item screen, a selected (ticked) comment shows a small camera icon just before its ⋯ menu. Tap it to open the same in-app camera described in Taking Photos in the App above, and the photo attaches to that comment. Only a selected comment shows the camera icon — this matches the report, which only prints photos from selected comments. The comment row itself doesn't show its photos — open the comment to see them (below).
Opening a comment's own detail screen (see Edit a Comment (Mobile)) shows the same Photos card items and sub-items use: Camera and From Library buttons, thumbnails showing each photo's upload status, and a selection mode for bulk delete. Tap a photo to open it — a still photo opens straight into the mark-up editor (see Annotating a Photo); a video opens in a viewer instead. From the editor's ⓘ Details button you can add a caption and use the standards-image checkbox. Selecting one or more photos shows a toolbar with a Move to item icon that moves the selected photos onto the comment's parent item — copying, or moving to a different item, isn't available.
Comment photos queue and upload the same way item photos do (see Uploading from the Mobile App above) — they wait offline and upload automatically once you're back online.
Not available yet for comment photos
On mobile, you can't add a photo to a brand-new comment before its first save, or reorder comment photos.
Opening a Photo That Is Still Waiting to Upload
A photo that hasn't uploaded yet shows in the item's photo row dimmed, with a small status badge. Tap it to open the photo full size — it works with no signal, because the photo is still on your phone. Pinch to zoom in, drag to move around while you're zoomed in, and double-tap to zoom in or back out. A label at the top says whether the photo is Waiting, Uploading, or in Needs attention.
Upload now appears at the bottom while the photo is waiting and uploads aren't on hold. If uploads are on hold — you're offline, Work offline is on, uploads are paused, or the app is waiting for Wi-Fi — the banner at the top says why, and the photo uploads on its own as soon as the hold lifts. A photo in Needs attention shows Review upload instead.
You can also press and hold a waiting photo to get Upload now (or Review upload) without opening it. While uploads are on hold, the menu shows Upload now (uploads on hold) greyed out.
Mark up a photo before it uploads
Tap Annotate to mark up a photo that hasn't uploaded yet — it works with no signal. Your mark-up stays on your phone with the photo and uploads together with it, so the report never shows the photo without it, and the photo row shows the marked-up version right away. You can open Annotate again to change it before it uploads; you always start from the clean photo with your earlier mark-up in place. While the photo is actually uploading, Annotate is greyed out for a moment. Photos taken on this phone are also kept on it after they upload (for about 30 days), so they open in the mark-up editor offline later. A photo from another device, the web, or the old app is saved on your phone when you open the inspection on Wi-Fi, or when you choose Save photos for offline from its ⋯ menu — see Save an Inspection's Photos for Offline. If one hasn't been saved yet, the editor says "Photo isn't on this device", and it opens the photo on its own when you're back online.
Pausing Uploads
Open Pending Sync and tap Pause uploads to hold the queue — useful on a slow connection, or to save data for something else. Nothing is lost while paused: your photos stay on the device, including through a restart, until you tap Resume uploads. The app never resumes a paused queue on its own — only tapping Resume clears it.
Publishing needs a resume
Publishing a report needs your photos to finish uploading first. If uploads are paused, publishing asks you to resume before it will generate the report.
Wi-Fi-Only Uploads
Turn off Upload over cellular in MoreApp Settings (under Uploads) and photos wait for Wi-Fi instead of using mobile data. The hold lifts automatically the moment you're back on Wi-Fi, and App Settings shows how many items are waiting so you can jump straight to Pending Sync to check them.
Need to send something over cellular just this once? Open Pending Sync and tap Upload over cellular there — it lifts the hold for the rest of this session only. Restarting the app, or reconnecting to Wi-Fi, puts the hold back if the setting in App Settings is still off.
When a Mobile Upload Needs Attention
Most upload problems fix themselves — the app retries quietly in the background without asking you to do anything. If something can't be fixed automatically, it shows up under Needs attention in Pending Sync, and as a red flag on the photo itself. Tap the photo to open it, then tap Review upload to see what happened, in plain language, and the one thing you can do about it. (You can also press and hold the photo and choose Review upload. A flagged mark-up on a photo that has already uploaded opens that screen with a single tap.)
| What you'll see | What it means | What you can do |
|---|---|---|
| Couldn't reach the server | Only shows up on a photo flagged by an older version of the app. Today, connection trouble on its own never needs attention — the queue keeps retrying automatically and clears the flag the next time it tries. | Try again now, wait for Wi-Fi, or discard it |
| Your sign-in expired | Your session ended before the upload finished. | Sign in again and it uploads on its own, or discard it |
| You no longer have access | The inspection isn't shared with you any more. | Discard — there's nothing else to do from this device |
| The item can't be found | The inspection or item this belongs to may have been deleted, or it may still be syncing to the server. | Try again now, or discard it if it still fails |
| The server refused this upload | Something about the file wasn't accepted. | Try again now, or discard it |
| Video is too large to upload | The file is bigger than the app's 250 MB per-file limit. | Save it to your photos, then remove it from the queue |
| File is no longer on this device | The file was removed from the device before it finished uploading. | Remove it from the queue — this only clears the flag |
One of these has no retry, on purpose
"You no longer have access" only offers to discard. Nothing on your device can restore access to an inspection that isn't shared with you any more, so the app doesn't offer a retry that can't work.
A 250 MB limit per file
If a file is larger than 250 MB, the app doesn't try to upload it and fail repeatedly. A video is usually caught right away, before it's added to the queue, with a message telling you to record a shorter clip (the limit is 30 seconds). Anything else that's too large — an oversized photo, or a video whose size can't be checked immediately — is flagged after it's queued, with a Save to my photos option, so your work isn't lost.
The app doesn't show attempt counts or retry countdowns anywhere — a photo is always simply Waiting, Uploading, or flagged in Needs attention.
Gallery View
Switch the inspection editor's view to Gallery (next to Board and Tree) to see every photo in the report in one place, with filter chips and a search box for finding photos by section or item name.
| Icon | Meaning |
|---|---|
| ⭐ star badge | Cover photo |
| ✏️ pen dot | Has annotations |
| 🔗 link dot | Linked copy |
| 📖 amber book icon | Standards image |
| 💬 speech-bubble badge | Comment photo |
| 📱 grey badge | Not uploaded yet |
While a photo is still on the phone that took it, the Inspection editor shows a small indicator near the top — for example "3 photos uploading from mobile." The same count shows as a badge on the Order's Inspections tab and in the Inspections list. These clear on their own once the phone finishes syncing. A photo that's still pending after a day shows as "not uploaded yet" — open the app on the phone that took it to finish syncing.
Filter the gallery with the All, Annotated, Captioned, Cover photos, and Not uploaded chips (the Not uploaded chip only appears when a photo hasn't uploaded from the mobile app yet). Chip counts reflect the whole gallery. With the search box empty, selecting a chip shows exactly that many photos; typing a search narrows the tiles but not the counts. If a search or chip filter doesn't match anything, the gallery shows "No photos match your filters." with an Clear filters button that resets the search box and chip back to the full grid.
Photos on sub-items appear in the gallery too, labelled with both names (for example, "Front Door › Left Hinge") so you can tell which sub-item a photo belongs to. Photos attached to comments appear as well: they carry a speech-bubble badge and show the comment's name under the item name. Click that label to open the comment.
A photo that hasn't uploaded from the mobile app yet always stays visible in the gallery, with a "Not uploaded yet" badge — even when its sub-item or comment isn't selected for the report. That way you can keep track of it while it finishes syncing.
If the item or comment it belonged to has since been deleted, the gallery shows it as Unassigned photo with the note "Its item or comment was deleted." There is nothing left to open, so that label isn't clickable, but the tile has a delete button in its top corner. Deleting the photo is what clears the "Some photos haven't uploaded yet" warning you see when you publish.
If comment photos won't load
If the gallery can't load a report's comments, a banner appears with a Retry button, and photo counts may be incomplete until you use it.
The gallery shows the same photos your report will. A photo on a sub-item that isn't selected stays hidden until you select the sub-item — unless it hasn't uploaded from the mobile app yet, in which case it stays visible with a "Not uploaded yet" badge.
A photo attached to a comment that isn't selected is usually hidden too. One exception: if that same photo is also linked directly to an item, it still shows under that item without the comment badge. This happens on some older Orders, and the report prints the photo there either way. That exception still follows the sub-item rule above — if the item itself is an unselected sub-item, the photo stays hidden, unless it hasn't uploaded from the mobile app yet.
In a template's gallery every photo is shown, because selection happens on the job.